
A muffled recording during playback is generally symptomatic of high frequency loss because of media failure, an incorrect wind, or a lack of high frequency information in the source recording. Unless the source is poorly recorded or the source recorder was malfunctioning during the original capture, muffled sound artifacts are the result of improper setup and playback. For instance, if azimuth is not adjusted to the source material prior to digitization, high frequencies will be lost and the resulting file will sound dull.
Even if the azimuth is correct, a tape that starts shedding oxide on the playback head will result in a similarly dull recording because the oxide buildup creates a greater distance from the tape to the playback head.
Tapes that are played with their oxide facing away from the head can be identified immediately because azimuth adjustments will not make a difference, the program will sound incredibly muffled, and the track configuration will sound incorrect (a half track mono tape will have reversed content in the left channel instead of in the expected right channel). There are some German tapes with B-wind, where the oxide faces away from the hub,1 and all cassettes are B-wind, although this is their normal configuration because a cassette playback head points up towards the tape, unlike an open reel decks whose head points down towards the tape. It is rare for a cassette to be incorrectly wound with the oxide facing in, away from the playback head, but it can happen.
Can it be fixed?
If the original recording is muffled because of poor mic placement, room acoustics, or some other reason, there’s not much that can be done at the digitization stage. In order to be sure that it is not hardware or media related though, you will want to:
- Adjust azimuth on the playback deck to match the source material
- Treat any failing media prior to digitization by cleaning or baking (if appropriate)
- Make sure the oxide side of the tape is facing towards the playback head during playback
When doing azimuth adjustment, an audio vectorscope is an indispensable tool. Hess provides a good “how to” guide on his blog:
Adjusting azimuth is very similar to manually focusing a camera lens. You rock through the point of best azimuth and see how far out it is on either side and try to manually find the centre between two equally bad side points. You tune for MAXIMUM high end. Don’t worry about making a tape screachy or annoying — all you’re doing is capturing what’s on the tape. There is no point of azimuth adjustment that will make the tape brighter than the original recording. Anything but the proper azimuth will produce a tape that is duller than the original recording. The point of proper azimuth is very narrow. Often, the best performance will be within +/- 5 degrees adjustment of the azimuth setting screw. Make sure you’re listening to the highs as you do this. If the cymbals stop, go back to where the cymbals are. If you don’t have cymbals, listen for whatever high end you have. If you don’t have good speakers, use headphones. Remember to listen to stereo programs in mono.2
On a vectorscope, the Lissajous pattern should be nearly vertical for a mono signal. When doing adjustment, observe the scope and watch how the waveform widens and narrows with each turn of the screw/knob, but above all use your ears to listen to changes in the high end.
Example(s)
Listen to muffled sound as a result of incorrect azimuth alignment on SoundCloud
Listen to muffled sound as a result of a tape being played oxide out on SoundCloud
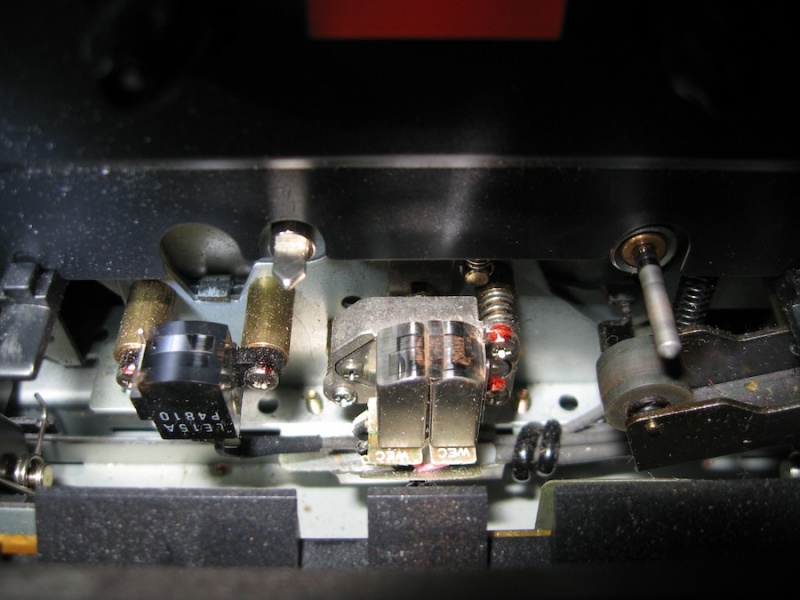
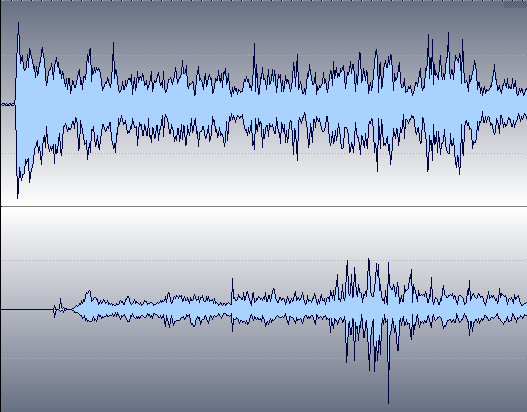
Oxide accumulation on a cassette playback head following the transfer of one side of a cassette (top image). Waveform of a half track mono open reel tape played oxide out (bottom image).
See also
References
1. Richard Hess, Tape winding, RichardHess.com, 19 March 2006. ↩
2. Richard Hess, Azimuth Hows and Whys, RichardHess.com, 27 September 2006. ↩